The best software product for preparing business plans in Word and Excel format
Strategic-Line Harmony of planning in your business

Production plan. Planning a Gantt chart


Gantt chart scheduling algorithm

The Gantt chart is a very handy and intuitive tool for planning costs. The Gantt chart format allows you to place the main stages of production on one page, indicate the cost and duration of the stages, therefore the Gantt chart is often used in presentations. However, financial calculations can only be presented in table format, therefore, the data from the Gantt chart must be transformed into a cost table in order to include these costs in the calculations of the business plan. It is also sometimes necessary to import a Gantt chart from MS Project, or vice versa - to export to MS Project. All this can be done in Budget-Plan Express.

Budget-Plan Express is a software product for preparing business plans and presentations in Word and Excel format, optimal for small businesses and studies (for students, graduate students, MBI students, etc.)

Build a financial model for your project using the Gantt chart! Try the new version of the program (6.02). Details ...

☛ Important! At the first stage, it is recommended to create a cost table, for example, in Excel, which will display the key parameters of the production stages - order, name, lead time and cost. You can also group stages into logical groups. After that, you can start planning the Gantt chart in the program. See the example table in the section “Cost planning for the implementation of production steps. Calculation of the plan".

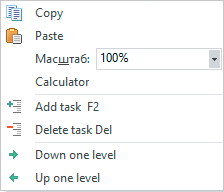
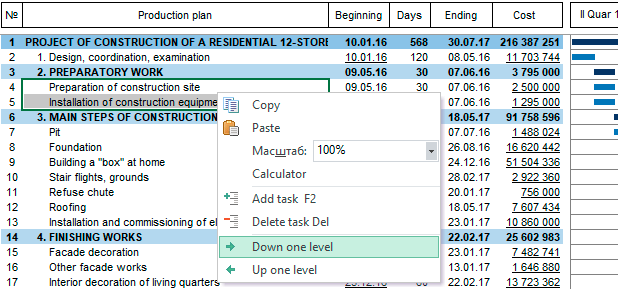
To add, remove or set subordination levels of stages, use the menu tools - the main or context menu, or hot keys. Use the right mouse button to open the context menu.

General planning algorithm

    1. First, on the task sheet, add the required number of stages. If you already have a ready-made spreadsheet in Excel, it is better to do it right away. Select the lines following the last line and select the "Add task" menu item.

    2. Then edit the name of each stage. Enter new text (name) directly from the keys, and for editing use a double click of the mouse.

    3. Now you can start editing the subordination of stages - select the group of subordinate stages and select the function "one level below" (the stage located on the line above will become the final one). Similarly, subordinate stages can be ungrouped.

    4. After that, using the calendar (click on the start date), edit the start and end of each stage - the start date is selected in the calendar, and the end date is set automatically after setting the duration. That is, the start date and duration are edited.

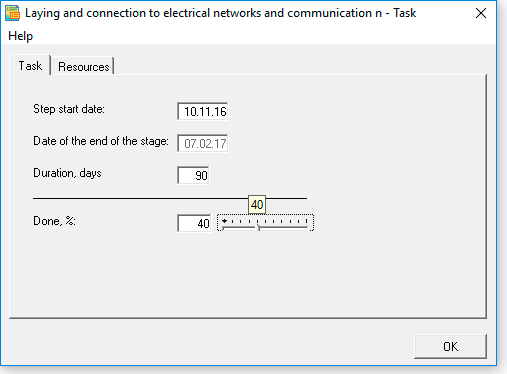
    5. Also, the date and duration can be changed in the resource editing form (click on the cost), in the "tasks" tab. Here you can additionally specify the percentage of the stage completion.

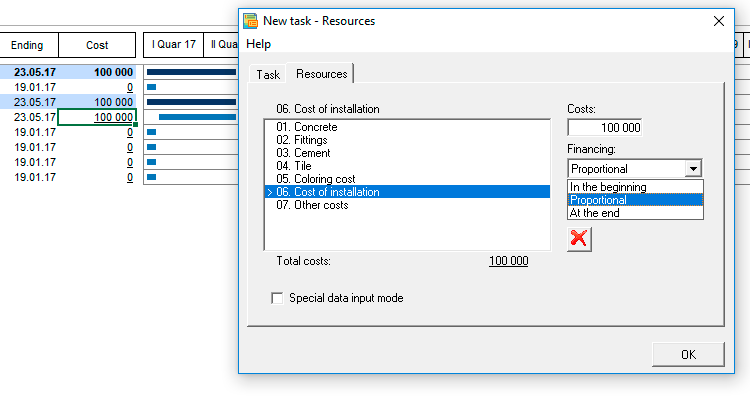
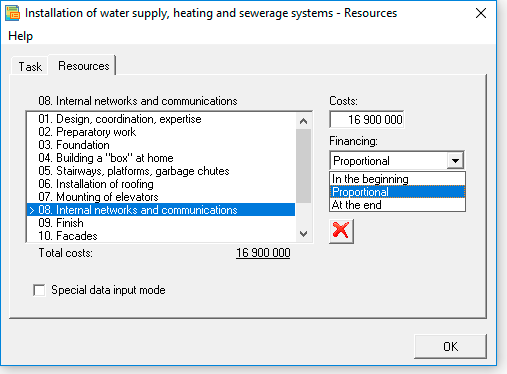
    6. Finally, enter the cost of the stage in the edit form (click on cost). In the "resources" tab, you need to select costs from the list, and specify the amount in the "cost amount" field.

    Previously, a directory irectory of "resources" and a "cost plan for the implementation of production stages" must be created (see "Preparing for planning. Directories" for more details). In the directory of "resources", costs should be structured in such a way as to accurately reflect the analytics of the production plan of the future business plan.

    ☛ Also, note that only direct (variable) costs are planned in the Gantt chart. For planning fixed costs, the following plan is used, which is called the "fixed cost plan".

    7. In the same form, indicate the key parameter for the calculation: "payment method" - at the beginning, at the end or proportional.

    ☛ The chosen payment method directly affects the financial result. Depending on the selected payment method, in the future, when the cost table is calculated, the cost will be included at the beginning or end of the stage, or will be proportionally distributed between the beginning and end of the stage.

    8. After finishing editing, perform the calculation. The calculation is performed from the main menu: Data → Calculate → Gantt Chart. The same is F9.

    The result of this calculation will be the transformation of data from the Gantt chart into the table "cost plan for the implementation of production stages". This is the next plan after the Gantt chart.

Important! The Gantt chart only helps to form a table of costs. However, additional steps need to be taken to clarify the details of cost accounting in the business plan. This must be done in the following plan, which is called the "cost plan for the implementation of production stages." See the following help sections:


Menu edit Gantt charts

Items the main menu "Gantt chart" (ribbon interface, Office 2007-2019):

Budget-Plan Express toolbar. Menu Gantt chart - the ribbon interface, Office 2007-2019


  1. Add a task.
  2. Delete the task.
  3. To the level below.
  4. To the level above
  5. Set an entry level for all tasks.
  6. Project period:
    • 1 year of the project;
      2 year of the project;
      3 year of the project;
      The whole project.
  7. Delete the cost of resources
  8. Delete all tasks.
  9. Export to MS Project.
  10. Import from MS Project.
Some of the functions duplicate the context menu. Call menu – click the right mouse button:

Menu of the Gantt chart. Planning Budget-Plan Express


Creating and editing a Gantt chart

Please note that for using some stage editing tools (adding, deleting and setting levels), the cursor should be placed in the column with the names of the stages - that is, the stage (range) is highlighted only in the Production Plan column.

To add, remove or set levels, you can use the main or context menu, or hot keys. To call the context menu, use the right mouse button.

The names of tasks (stages) are edited by typing or double-clicking (editing a line). For editing dates and cost forms are used. Moreover, to add value to the stage, first you need to create a resource directory. That is, the cost of each particular stage is not abstract, but refers to a specific resource (s). Thus, when calculating the “Production Plan”, the Gantt chart is transformed into the next cost plan “for the realization of production stages”.

Adding value to the stage

    1. Add (insert) task

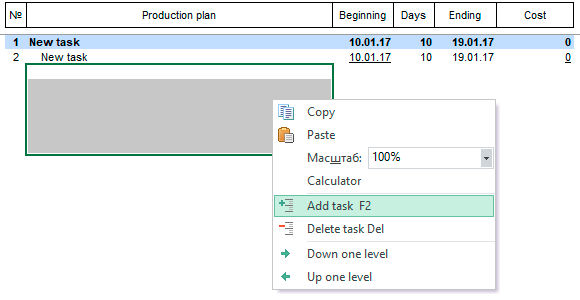
    To add a new task (several tasks), place the cursor at the end of the task list (on the first blank line), and click “add” or “F2”. To add multiple tasks, select the appropriate range after the task list.

    Add task

    Select the menu item "Main menu → Gantt chart → Add task" or "Context menu → Add task" (the shortcut menu activated by right mouse button), the same F2.

    You can also insert one task into the task list using the menu item “insert” (“add”) or “F2”. To do this, place the cursor on the place where you want to insert a new task:

    Edit Gantt chart - add task. Planning Budget-Plan Express


    2. Delete task

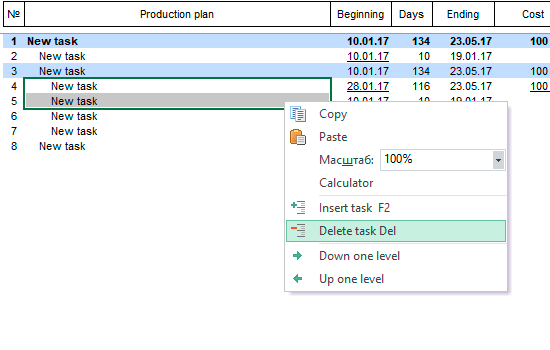
    Pay attention, you can not delete the first stage (task) and all the final stages. To delete the final stage, you must first delete all subordinate tasks.

    To delete several steps, select the appropriate range. At the same time, the deleted stages must be of the same nesting level, that is, the stages at different levels are deleted separately.

    Delete task

    Select the menu item "Main menu → Gantt chart → Remove task" or "Context menu → Delete task" (the shortcut menu activated by right mouse button), the same Del.


    3. To the level below

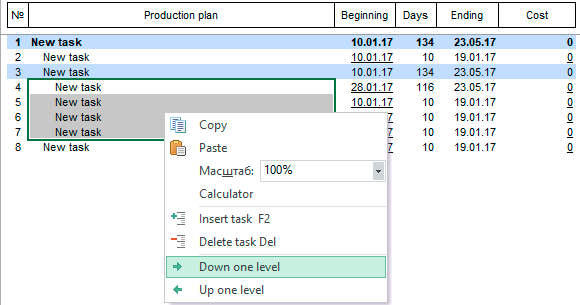
    The “One level down” function sets the subordination of all selected tasks (selected range) to one task, which is located above the range.

    First you need to select the range, then call the function, as shown in the picture:

    To the level below. Planning Budget-Plan Express

    After the function, for sub-task will be installed the 3rd level of nesting, and the main task will display the date limit and the total value of subordinate tasks.

    In some cases, before performing subordinate tasks should be grouped, i.e. to perform the reverse function "the next level". In this case, the program will display the appropriate message.


    4. To the level above

    The function "Up one level" cancels the previously established subordination of all selected tasks. First, select the range, then call the function.

    After the function is executed, the subordination of all selected tasks (the selected range) will be canceled, and the nesting level will be set for them.

    In some cases, to cancel subordination, you first have to ungroup all the subordinate tasks, and then re-establish the levels of subordination (nesting). In case of an error, the program will issue the appropriate messages.


    To the level above


    Only subordinate or independent tasks can be fully edited; in the final tasks, only the name can be edited.


    5. To set the start and end dates and duration

    Set dates
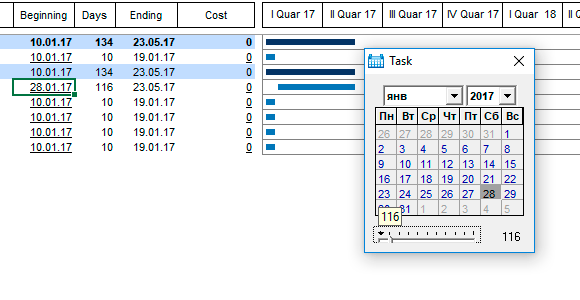
    option 1. Calling the editing form of the "calendar" - one click on the link in the active column "Start", the same thing - F2.

    Set the start and end dates and the duration of the step, using the calendar form. Planning Budget-Plan Express

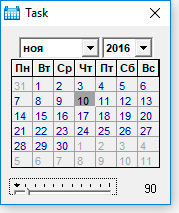
    In the edit form of the calendar, you can set the "start date" and "duration" of a task by moving the slider. The end date must not be set, it is calculated automatically as the sum of the "start date" and "duration".

    option 2. Calling the calendar editing form - one click on the link in the column "Cost", and select the "Task" tab, the same thing - F2.

    to Set the start and end dates and the duration of the stage. Planning Budget-Plan Express


    The program sets the input constraints of the "date" and "duration", within the project period (within 36 months).


The form of editing "resources (stages)"

Call the form of editing "resources (stages)" with one click of the mouse on the active link "Cost", the same thing - F2.

The form of editing Resources (stages)


In the editing form, you can select one of the tabs:
  1. Tab "Resources".
  2. In this tab, you need to specify two parameters: "cost" and "financing":

    1. At the beginning;
    2. Proportional;
    3. At the end.

    When you click the "Delete Costs" button, all costs for all resources (for this task) will be reset.

  3. Tab "Tasks".
  4. In this tab, you can edit the "start date" and "duration" of the task, and also, if necessary, set the "percentage of completion" for the task.

    ☛ Note that the specified percentages are also transferred and displayed in MS Project (when exporting the project).


    Resources are created separately from the task in the directory "resources and production stages". They usually reflect the cost. For example, the resources in construction can be the following: the cost of labor, materials, cost of construction equipment, payment of subcontractors and other resources. At the same time, the resources directory can coincide or partially coincide with the list of tasks, it all depends on the choice of this or that approach to describe the cost of tasks.


Оплатите лицензию в личном кабинете Select your Budget-Plan Express licenses and pay in your personal account - in rubles or other currency


Applied and recommended procedures and functions


  1. If you deleted some data by mistake or performed the action, causing damage to data, exit the program without saving: "Main menu → Project file → quit without saving".

  2. If you exit the program, save the changes: "Main menu → Project file → Save" (or Ctrl+S). Or use the program exit with saving.

  3. Periodically back up the data: "Main menu → Project file → Save and backup" or Ctrl+Shift+S. File project saved in the folder "backup", the project name will display date and time of saving. To restore the file, just copy it in system folder («BPlanExpress»).

  4. If you have several projects (or calculation options), create a template file and, starting a new project, open the template file where your settings or preliminary project calculations are saved, select the menu item: "Main menu → Project file → To create a new project". This will shorten the development time of projects.
  5. ☛ Note that a new project is created in the system folder ("BPlanExpress"), which opens by default.

  6. Complete the final calculation: "Main menu → Data → Calculate". Same - F9.

  7. Clear table (reset values): "Main menu → Data → Clear table".

  8. Delete the table (delete all data and settings of the table settings): "Main menu → Data → Delete table".

  9. Clear the string (reset value): "Context menu (right mouse button) → Clear line."

  10. Translit: "Main menu → Settings → Translit text tables". Select the translation language.

  11. Export: "Main menu → Reports → Export to Excel". In the same place - export to Word.

  12. Financial and investment analysis. Settings parameters of project performance indicators:"Main menu → Settings → Investment analysis".

  13. Quick graph: "Context menu (right mouse button) → Graph of a line." Before the call, place the cursor anywhere in the row with the desired data. See also «Preparation of reports and business plans. Graphics».


Share:
Copyright © 2007-, support@strategic-line.ru: send a message