Preparation for planning. Import data
Importing data can shorten the time it takes to prepare a business plan. This is important if you can get most of the data, for example, from the Internet or other external sources. These can be currency rates, price forecasts, etc.
You can import directories, operational plans and other trends from pre-prepared formats into the program (this section does not cover import from MS Project).
See later in this section for how named ranges are created and how data is imported.
Import data from Named Ranges
This section contains information about importing data into a Budget Plan Express from external Excel files with named ranges. A special procedure allows you to import directories and data for operational plans for the whole project period (36 months of the project) from files (where previously named ranges were created). For information on importing (exporting) data from MS Project (in MS Project), see: Exporting and importing Gantt charts - Exchange with MS Project
☛ Use the keyboard to switch between Excel books (Ctrl + Tab), if the "Budget-Plan Express" project window becomes unavailable when opening Excel files.
When you open Excel files, a new instance of the Excel workbook is created, that is, the file should open in a new window. However, in some installations or in legacy versions of Excel, a new file is opened in place of the old windows. In most cases, this drawback is considered a flaw in the old (Excel 2010 and earlier) versions.
1. Named ranges
Data is imported only from an Excel file with a named range. The program provides for the import of directories, data for tables of operational plans and for "built-in" tables (in forms of editing). The creation of preliminary directories is justified when working with a large number of projects, in order to save time. For example, data for import can be prepared by units that are responsible for these data or regularly update them.
You can import data from two types of named ranges, a predetermined dimension (1÷30 x 1 and 1÷30 x 36):
- For directories, a named range with 1 column (1÷30; 30 x 1);
- For plans - a named range with 36 columns-periods (1÷30; 36);
- Named range for trend import - with 36 columns-periods (1 x 36).
 If the imported data does not meet one of the requirements, they are ignored by the program.
To create a named range in an Excel workbook, follow these steps:
- step - select the range of cells in which the melons were prepared for import;
- step - in the upper left corner - in the "Name" field, add the name of the range;
- step - press "Enter."
Press "F3" (or "Ctrl + F3" ) to view all the ranges created in this book.
The same can be done through the main menu of Excel: "Formulas → name Manager → Assign the name" ...and the currently selected range will be named.
An example of a named range for the "Product1" directory is the name in the upper-left corner:
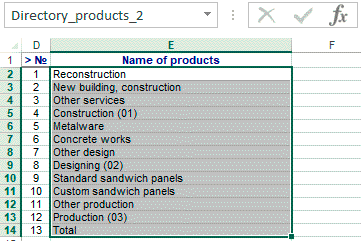
Budget-Plan Express is a software product for preparing business plans and presentations in Word and Excel format, optimal for small businesses and studies (for students, graduate students, MBI students, etc.)
Use two interface languages - Russian and English, as well as “transliteration” to translate your business plan into any language! Details ...
2. Open the file with named ranges. The window import parameters
 If the file does not contain named ranges, or formats the data to be imported do not meet the requirements of dimension (1÷30 x 1 or 1÷30 x 36), the screen will display the message: "file not found named ranges to import data".
Then, all the named ranges that the program finds the file, get the list of forms (their names). Here in the edit window of import settings, you need to install the appropriate elements:
- step - select "range name" from the list of names
- step - specify "where to transfer" the data;
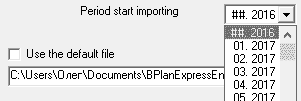
- step - select the "import start time" and click "OK."
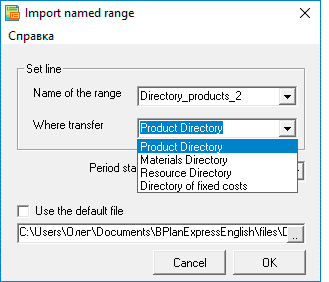
For ranges with dimension "1÷30 x 1" the program will offer to copy the data in the directories (in the list of "where to upload" will appear the list of directories)
- Product Reference;
- Directory of Materials;
- Directory of resources and production phases
- The fixed cost directory.
Example, when the list "where to send" - the names of directories:
The result of the import procedure for the directory:
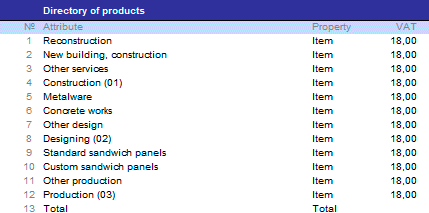
☛ Note that by default, all attributes will be assigned to a property Element, the last attribute – a property total. The attribute property "Amount", you must specify your own!
If you import data to a table or other operating plans (with the dimension ranges "1÷30 x 36"), in the list of "where to upload" will appear a list of the plans or specified data to import:
- Sales plan-price;
- Sales plan -quantity
- Procurement Plan-price;
- Plan fixed costs;
- Forecasting trends;
- Forecast exchange rates;
- Copy to clipboard .
After the correspondence is established in the import list, select the period from which the data will be imported, and click OK.
Sample import data in the operational plan: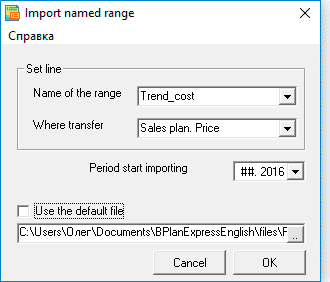
The result of the import, for example, trend "Sales plan-price", you can see in the edit form "plan sales".
3. Copy data to the clipboard
If you select "Copy to clipboard", the data can then be inserted into unlocked plans and "built-in" tables. To do this, you need to execute the "paste" command - from the main or context menu, or press "Ctrl + V" (see also the main menu "Data"). To account for the period starting from which data will be imported, just put the cursor in the appropriate text box, and select "paste".
Copying trends from the clipboard is available in all the "built-in" tables, and in those plans where the data do not depend on the outcome of the calculation:
- Plan fixed costs;
- Plan of total, non-operating and other costs (PAD);
- Financial plan (PAD and sample data)
- Investment plan (PAD and sample data)
- Financial analysis (Forecasting trends and Forecasting exchange rates).
In other plans, copying trends from the clipboard is not provided.
4. Preparing files for importing data
When you import data into the operational plans need to take into account the structure of the plan, which in turn must match the structure of the data in the named ranges. Watch to the imported table (for operational plan) contain 36 columns (periods), and then create named ranges.
Create meaningful names for named ranges so that you can easily figure out the imported list. Named ranges can be stored in one or in different files, preferably in the "files" folder, which is opened by default. Periodically, the data in these files could be updated as needed.

☛ Note that the program will specify the path to the file by itself.
